Set It And Forget It: Time To Get The Most Out Of Your Tripod
Are your photos off-balance and blurry? Utilizing a tripod will elevate your photos and bring clarity back to your portfolio.

Time to take your photography game seriously?
Tired of shaky selfies that leave you looking a bit blurry-eyed and off-balance? Then it’s time for a tripod! A tripod can stabilize your camera and give you sharper pictures with improved clarity - even with low-light settings.
You can also make creative changes by increasing or decreasing the angle of shot, so you’re never left scrambling for ideas again.
Create pro shots in no time, without breaking your budget. Perfect for carrying around during vacation trips or day hikes! Tripods also come in various sizes and prices, so there's something to fit every need and budget.
Benefits Of Using A Tripod
When you try to capture the object which is moving or in motion, then you will tend to get a shaky image at the end. When you use the tripod to capture the images, you can shoot the best images without any shake and with the much sharpness in the picture.
Due to the lack of stability in the camera, you may tend to capture the blurry images. When you use the tripod to capture the images, then the camera’s can be held at the right position and at the end of the day, you will able to shoot the perfect picture.
Using a tripod will help you to gain full control over the camera. Say if you are using the most advanced camera, it may be bit heavy and hence will be tough for you to carry it in many circumstances.
In this type of situation, having a tripod will help you to handle the camera with more freedom as you need have to worry about lifting the camera.
How To Use A Tripod
Decide on your location. Before you start setting up your tripod, it is best to know where you want to take your photo.[1] Be sure the backdrop will work for your photograph, and decide on the direction you will want to take your photo.
Arrange the legs. Point one of the legs in the same direction that your camera will face. Doing so will create a space between the other two legs for you to stand. This will make it easier and more comfortable for you to work while focusing and shooting.
Extend the legs. Open the latches that release the legs and extend the sections. Start by extending the thickest sections first as they will provide more stable support than the thinner segments.
Be sure the legs are secure. If you are on an uneven surface you will have to readjust the legs until you can get the length just right. When on soft ground or sand, push the tripod legs all the way down until it is pressed against something solid.
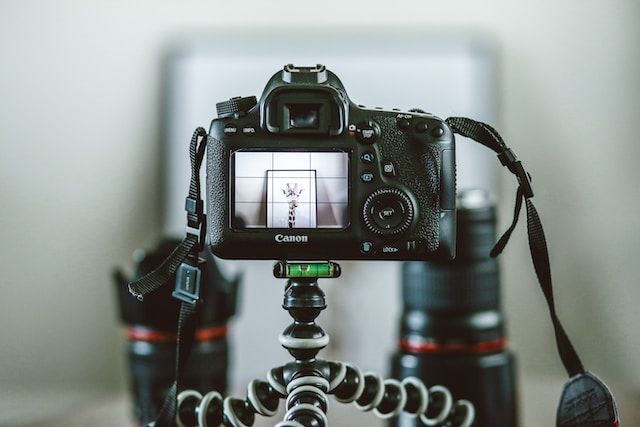
Check the level on the tripod. Some models come with a level built-in on the top of the tripod. Otherwise, you can step back and make sure the center post of the tripod is perpendicular to the ground.
Avoid raising the center post. If you set up your tripod and realize you need your camera to be higher, adjust the legs first. The three legs of the tripod provide much better stability. Using the center post will make your setup less stable. Only use the center post as a last resort, or to make minor adjustments when you need an inch or two of additional height.
Tripod Tips & Tricks
- Explore the scene before setting up your tripod. Once you’ve played around with the camera and found the best shot, figure out how to get your tripod set up to put the camera in that place. (Believe it or not, many people do the opposite, plopping down their tripod camera in some random place and then trying to get the right shot.)
- Make sure the lowest legs are in contact with the ground. That is, extend the lower sections before extending the top sections. This keeps the dirt and mud out of your locking mechanisms.
- Consider buying a tripod that uses twist locks. Twist locks are much faster than clamps, especially for setting up. (Mark demonstrates this admirably in the video.) Clips are also harder for gloves and any other time you have something in/on your hand. They can also get gunk in them.
- Make sure you have a locking mechanism on your tripod head. This will prevent you from accidentally releasing your camera from the head (a rather tragic end to any photo session).
Tripod Setup FAQs
You just got a new tripod, but have no idea how to set it up.
Even if you're an experienced photographer, setting up a tripod can be confusing. There are so many different models and options that it's hard to know where to start.
This guide will walk you through the basics of tripod setup, from attaching the head to adjusting the legs. We'll also show you how to use your tripod for different types of shots.
What is the best tripod for my phone?
The best tripod for your phone will depend on what type of photography you are doing and what features you are looking for. A mini tripod is ideal if you need to take photos in tight spaces or want something lightweight and easy to transport.
A full-size tripod will offer more stability, allowing for taking longer exposures, panoramas, and low-light shots with better results.
Look for tripods with adjustable legs and a center column so you can adjust the height easily, as well as a ball head so you can tilt and rotate your camera.
What is the best tripod for iPhones and other smartphones?
The best tripod for iPhones and other smartphones is the Joby GorillaPod Mobile Mini. This tripod has a versatile design that can be easily adjusted to fit a variety of devices, from small cameras to large phones.
It also features rubberized feet for superior grip on all surfaces, ensuring your phone stays in place no matter what angle you need.
It's flexible legs allow you to mount it onto poles, branches, or other objects for incredibly unique shots that would otherwise be impossible. Finally, its compact size makes it easy to carry around, and can even fit inside most pockets.
How do I use a tripod?
To use a tripod, begin by first choosing a sturdy and stable spot for the tripod's legs. Open the legs of the tripod and adjust them to the desired height.
Attach your camera or smartphone to the top of the tripod with either an adapter or directly onto its mounting plate. Make sure that you have securely attached it before adjusting any settings on your camera or phone.
Once in place, activate the locking mechanisms on each of the legs and make any final adjustments needed to ensure that your camera is positioned correctly. Lastly, adjust any settings on your device as desired and take your photo!
What are the best tripods on Amazon?
The best tripods on Amazon vary depending on what you're looking for. For basic point-and-shoot cameras, the Joby GorillaPod 1K Kit is an excellent choice due to its flexible legs and strong grip. It's also lightweight and easy to store.
If you want something more robust, the Manfrotto Befree Advanced Aluminum Tripod is a great option. It has adjustable legs for different angles and a reliable locking system for stability. Additionally, it comes with a carrying bag for easy transport.
For serious photography enthusiasts, a professional-grade tripod like the Gitzo GT3542LS Series 3 Systematic Carbon Fiber 4 Section Tripod is the way to go. It features ultra-smooth movements and secure leg locks for stability in any terrain.
Plus, it's made from carbon fiber making it lightweight yet sturdy enough to carry large camera setups.
How do I attach a camera to a tripod?
Attaching a camera to a tripod is a relatively simple process. To start, you'll need to locate the mounting screw at the bottom of your camera. The mounting screw is usually located on the underside of the camera or near the base.
On most cameras, it will be a standard 1/4-20 screw, but you may also find some cameras with alternate sizes such as 3/8-16. Once you have identified where the mounting screw is located, you can attach your camera to your tripod by lining up the mounting screw on your tripod head with the threaded hole at the bottom of your camera and then tightening it with a small wrench (usually included with tripods).
In conclusion, using a tripod can be a great way to help you take sharper, more stable photos. It also offers many benefits such as allowing you to shoot at low angles and enabling you to capture time-lapse footage.
With the right tools and techniques, taking your photos with a tripod will become easy and enjoyable.
So if you're looking for a way to improve your photography skills and get the most out of any shot, set it up, secure it in place, and let the tripod do its job!
We've done the research so you don't have to! To browse our Top Picks for Best Tripod Case please click the link below!
 Ryan Mattox
Your Friends,
LoveNatureReviews Team